Spring-Security-Oauth2第一篇 @[toc]
1. Oauth 介绍 OAuth 是一个关于授权(authorization)的开放网络标准,在全世界得到广泛应用,目前的版本是2.0版。
OAuth 是一个开放标准,允许用户让第三方应用访问该用户在某一网站上存储的私密的资源(如照片,视频,联系人列表),OAuth 2.0
2. Spring Security Oauth2 的使用 2.1. 使用MySQL存储 access_token 和 client 信息 在学习过程中,很多示例中,所有的token信息都是保存在内存中的,这显然无法在生产环境中使用(进程结束后所有token丢失, 用户需要重新授权),
授权服务器中的数据存储到数据库中并不难 spring-security-oauth2 已经为我们设计好了一套Schema和对应的DAO对象。
2.2. 数据结构脚本 spring-security-oauth2 为我们提供了 Schema:
https://github.com/spring-projects/spring-security-oauth/blob/master/spring-security-oauth2/src/test/resources/schema.sql
注意: 框架所提供的数据脚本适用于 HSQL,语句中会有某些字段为 LONGVARBINARY 类型,它对应 MYSQL 的 BLOB 类型。
2.3. 相关的接口 spring-security-oauth2 通过 DefaultTokenServices 类来完成 token 生成、过期等 OAuth2 标准规定的业务逻辑,DefaultTokenServices 又是通过 TokenStore 接口完成对生成数据的持久化。
对于 Token 信息,本篇文章使用 JdbcTokenStore,在生产环境中更喜爱使用 RedisTokenStore。
对于 Client 信息,本篇文章使用 JdbcClientDetailsService。
2.4. 服务类型 OAuth2 在服务提供者上可分为两类:
注意:这两者有时候可能存在同一个应用程序中(即SOA架构)。在Spring OAuth中可以简便的将其分配到两个应用中(即微服务),而且可多个资源获取服务共享一个授权认证服务。
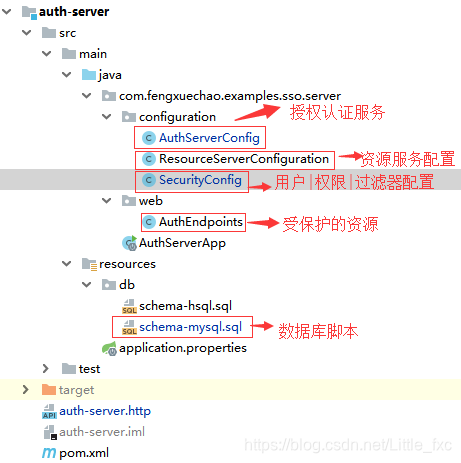
2.5. 项目结构和 maven 依赖 前面浅尝辄止的讲述了一些原理,下面的内容是示例展示。
1 2 3 4 5 6 7 8 9 10 11 12 13 14 15 16 17 18 19 20 21 22 23 24 25 26 27 28 29 30 31 32 33 <dependencies > <dependency > <groupId > org.springframework.boot</groupId > <artifactId > spring-boot-starter-security</artifactId > </dependency > <dependency > <groupId > org.springframework.security.oauth</groupId > <artifactId > spring-security-oauth2</artifactId > </dependency > <dependency > <groupId > org.springframework.boot</groupId > <artifactId > spring-boot-starter-web</artifactId > </dependency > <dependency > <groupId > org.springframework.boot</groupId > <artifactId > spring-boot-starter-data-redis</artifactId > </dependency > <dependency > <groupId > org.springframework.boot</groupId > <artifactId > spring-boot-starter-actuator</artifactId > </dependency > <dependency > <groupId > com.alibaba</groupId > <artifactId > druid-spring-boot-starter</artifactId > <version > 1.1.10</version > </dependency > <dependency > <groupId > mysql</groupId > <artifactId > mysql-connector-java</artifactId > </dependency > </dependencies >
2.5.1. 配置授权认证服务 1 2 3 4 5 6 7 8 9 10 11 12 13 14 15 16 17 18 19 20 21 22 23 24 25 26 27 28 29 30 31 32 33 34 35 36 37 38 39 40 41 42 43 44 45 46 47 48 49 50 51 52 53 54 55 56 57 58 59 60 61 62 63 64 65 66 67 68 69 70 71 72 73 74 75 76 77 78 79 80 81 82 83 84 85 86 87 88 89 90 91 92 93 94 95 96 97 98 99 100 package com.fengxuechao.examples.sso.server.configuration;import org.springframework.beans.factory.annotation.Autowired;import org.springframework.context.annotation.Bean;import org.springframework.context.annotation.Configuration;import org.springframework.security.authentication.AuthenticationManager;import org.springframework.security.oauth2.config.annotation.configurers.ClientDetailsServiceConfigurer;import org.springframework.security.oauth2.config.annotation.web.configuration.AuthorizationServerConfigurerAdapter;import org.springframework.security.oauth2.config.annotation.web.configuration.EnableAuthorizationServer;import org.springframework.security.oauth2.config.annotation.web.configurers.AuthorizationServerEndpointsConfigurer;import org.springframework.security.oauth2.config.annotation.web.configurers.AuthorizationServerSecurityConfigurer;import org.springframework.security.oauth2.provider.client.JdbcClientDetailsService;import org.springframework.security.oauth2.provider.token.TokenStore;import org.springframework.security.oauth2.provider.token.store.JdbcTokenStore;import javax.sql.DataSource;@Configuration @EnableAuthorizationServer public class AuthServerConfig extends AuthorizationServerConfigurerAdapter private static final String DEMO_RESOURCE_ID = "*" ; @Autowired AuthenticationManager authenticationManager; @Autowired private DataSource dataSource; @Bean public TokenStore tokenStore () return new JdbcTokenStore(dataSource); } @Bean public JdbcClientDetailsService clientDetailsService () return new JdbcClientDetailsService(dataSource); } @Override public void configure (ClientDetailsServiceConfigurer clients) throws Exception clients.jdbc(dataSource) .withClient("client_1" ) .secret("123456" ) .resourceIds(DEMO_RESOURCE_ID) .redirectUris("https://www.baidu.com" , "http://localhost:8081/product/1" ) .accessTokenValiditySeconds(1200 ) .refreshTokenValiditySeconds(50000 ) .authorizedGrantTypes("client_credentials" , "refresh_token" , "password" , "authorization_code" ) .scopes("all" ) .authorities("client" ).and().build(); } @Override public void configure (AuthorizationServerEndpointsConfigurer endpoints) throws Exception endpoints.tokenStore(new JdbcTokenStore(dataSource)); endpoints.setClientDetailsService(clientDetailsService()); endpoints.authenticationManager(authenticationManager); } @Override public void configure (AuthorizationServerSecurityConfigurer oauthServer) throws Exception oauthServer.allowFormAuthenticationForClients(); oauthServer.checkTokenAccess("isAuthenticated()" ); } }
2.5.2. 配置用户权限|拦截保护的请求 1 2 3 4 5 6 7 8 9 10 11 12 13 14 15 16 17 18 19 20 21 22 23 24 25 26 27 28 29 30 31 32 33 34 35 36 37 38 39 40 41 42 43 44 45 46 47 48 49 50 package com.fengxuechao.examples.sso.server.configuration;import org.springframework.context.annotation.Bean;import org.springframework.context.annotation.Configuration;import org.springframework.core.annotation.Order;import org.springframework.security.config.annotation.web.builders.HttpSecurity;import org.springframework.security.config.annotation.web.configuration.EnableWebSecurity;import org.springframework.security.config.annotation.web.configuration.WebSecurityConfigurerAdapter;import org.springframework.security.core.userdetails.User;import org.springframework.security.core.userdetails.UserDetailsService;import org.springframework.security.provisioning.InMemoryUserDetailsManager;@Order(2) @Configuration @EnableWebSecurity public class SecurityConfig extends WebSecurityConfigurerAdapter @Bean @Override protected UserDetailsService userDetailsService () InMemoryUserDetailsManager manager = new InMemoryUserDetailsManager(); manager.createUser(User.withUsername("user_1" ).password("123456" ).authorities("USER" ).build()); manager.createUser(User.withUsername("user_2" ).password("123456" ).authorities("USER" ).build()); return manager; } @Override protected void configure (HttpSecurity http) throws Exception http .csrf().disable() .requestMatchers().antMatchers("/oauth/**" , "/login/**" , "/logout/**" ) .and().authorizeRequests().antMatchers("/oauth/*" ).authenticated() .and().formLogin().permitAll(); } }
2.5.3. 配置资源获取服务 1 2 3 4 5 6 7 8 9 10 11 12 13 14 15 16 17 18 19 20 21 22 23 24 25 26 27 28 29 30 31 32 package com.fengxuechao.examples.sso.server.configuration;import org.springframework.context.annotation.Configuration;import org.springframework.core.annotation.Order;import org.springframework.security.config.annotation.web.builders.HttpSecurity;import org.springframework.security.config.http.SessionCreationPolicy;import org.springframework.security.oauth2.config.annotation.web.configuration.EnableResourceServer;import org.springframework.security.oauth2.config.annotation.web.configuration.ResourceServerConfigurerAdapter;import org.springframework.security.oauth2.config.annotation.web.configurers.ResourceServerSecurityConfigurer;@Order(6) @Configuration @EnableResourceServer public class ResourceServerConfiguration extends ResourceServerConfigurerAdapter private static final String DEMO_RESOURCE_ID = "*" ; @Override public void configure (ResourceServerSecurityConfigurer resources) resources.resourceId(DEMO_RESOURCE_ID).stateless(true ); } @Override public void configure (HttpSecurity http) throws Exception http.sessionManagement().sessionCreationPolicy(SessionCreationPolicy.IF_REQUIRED) .and().requestMatchers().anyRequest() .and().anonymous() .and().authorizeRequests() .antMatchers("/**" ).authenticated(); } }
注意:ResourceServerConfiguration 和 SecurityConfiguration上配置的顺序
2.5.4. 受保护的资源 1 2 3 4 5 6 7 8 9 10 11 12 13 14 15 16 17 18 19 20 21 22 23 24 25 26 27 28 29 30 31 32 33 34 package com.fengxuechao.examples.sso.server.web;import org.springframework.security.core.Authentication;import org.springframework.security.core.context.SecurityContextHolder;import org.springframework.web.bind.annotation.GetMapping;import org.springframework.web.bind.annotation.PathVariable;import org.springframework.web.bind.annotation.RestController;import java.security.Principal;@RestController public class AuthEndpoints @GetMapping("/product/{id}") public String getProduct (@PathVariable String id) Authentication authentication = SecurityContextHolder.getContext().getAuthentication(); return "product id : " + id; } @GetMapping("/order/{id}") public String getOrder (@PathVariable String id) Authentication authentication = SecurityContextHolder.getContext().getAuthentication(); return "order id : " + id; } @GetMapping("/user/me") public Principal user (Principal principal) return principal; } }
2.5.5. 测试
客户端凭据(客户端ID以及Key)模式
发送 POST 请求获取 access_token
request 1 POST http://localhost:8081/oauth/token?grant_type=client_credentials&scope=all&client_id=client_1&client_secret=123456
请求结果:
1 2 3 4 5 6 { "access_token" : "d3025813-fd1f-4ccb-9faa-495cad16deff" , "token_type" : "bearer" , "expires_in" : 1199 , "scope" : "all" }
将请求结果中的 access_token 取出并作为请求受保护资源 api 的请求参数
request 1 GET http://localhost:8081/order/1?access_token=d3025813-fd1f-4ccb-9faa-495cad16deff
授权码模式
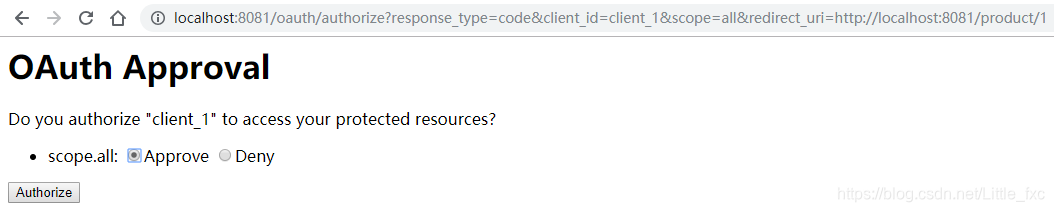
授权链接
1 http://localhost:8081/oauth/authorize?response_type=code&client_id=client_1&scope=all&redirect_uri=http://localhost:8081/product/1
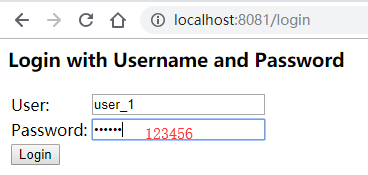
登陆后,同意授权
将请求连接中的 code 作为请求令牌的请求参数
1 POST http://localhost:8081/oauth/token?client_id=client_1&grant_type=authorization_code&redirect_uri=http://localhost:8081/product/1&client_secret=123456&code=7fTmqZ
请求结果:
1 2 3 4 5 6 7 { "access_token" : "b485ed7c-3c92-43b0-97f2-0dc54da61d80" , "token_type" : "bearer" , "refresh_token" : "02b204ea-31f5-45c0-809e-ef2693117d31" , "expires_in" : 1199 , "scope" : "all" }
取出 access_token 作为受保护的请求资源的令牌
request 1 GET http://localhost:8081/product/1?access_token=b485ed7c-3c92-43b0-97f2-0dc54da61d80
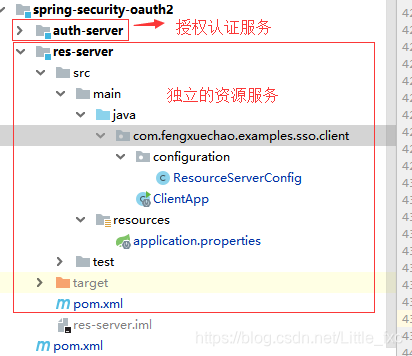
2.5.6. 如何分离授权服务和资源服务 在上文 2.4. 服务类型 章节中,提过 在Spring OAuth中可以简便的将其分配到两个应用中(即微服务),而且可多个资源获取服务共享一个授权认证服务。
ResourceServerTokenServices 是组成授权服务的另一半。
若是资源服务器和授权服务在同一个应用,可以使用 DefaultTokenServices
若是分离的。ResourceServerTokenServices 必须知道令牌的如何解码。
ResourceServerTokenServices 解析令牌的方法:
使用 RemoteTokenServices,资源服务器通过HTTP请求来解码令牌。每次都请求授权服务器的端点 /oauth/check_toke,以此来解码令牌
若是访问量大,则通过http获取之后,换成令牌的结果
若是 jwt 令牌,需请求授权服务的 /oauth/token_key,来获取 key 进行解码
注意:授权认证服务需要把/oauth/check_toke暴露出来,并且附带上权限访问。
项目结构
独立资源服务器配置
1 2 3 4 5 6 7 8 9 10 11 12 13 14 15 16 17 18 19 20 21 22 23 24 25 26 27 28 29 30 31 32 33 34 35 36 37 package com.fengxuechao.examples.sso.res.configuration;import org.springframework.context.annotation.Configuration;import org.springframework.security.config.annotation.web.builders.HttpSecurity;import org.springframework.security.config.http.SessionCreationPolicy;import org.springframework.security.oauth2.config.annotation.web.configuration.EnableResourceServer;import org.springframework.security.oauth2.config.annotation.web.configuration.ResourceServerConfigurerAdapter;import org.springframework.security.oauth2.config.annotation.web.configurers.ResourceServerSecurityConfigurer;@Configuration @EnableResourceServer public class ResourceServerConfig extends ResourceServerConfigurerAdapter private static final String DEMO_RESOURCE_ID = "*" ; @Override public void configure (ResourceServerSecurityConfigurer resources) resources.resourceId(DEMO_RESOURCE_ID).stateless(true ); } @Override public void configure (HttpSecurity http) throws Exception http.sessionManagement().sessionCreationPolicy(SessionCreationPolicy.IF_REQUIRED) .and().requestMatchers().anyRequest() .and().anonymous() .and().authorizeRequests().antMatchers("/**" ).authenticated(); } }
配置文件
application.properties
1 2 3 4 5 6 7 server.port=8082 security.oauth2.client.client-id=client_1 security.oauth2.client.client-secret=123456 security.oauth2.resource.user-info-uri=http://localhost:8081/user/me security.oauth2.authorization.check-token-access=http://localhost:8001/oauth/check_token
受保护资源
1 2 3 4 5 6 7 8 9 10 11 12 13 14 15 16 17 18 19 20 21 22 23 24 25 26 27 28 29 30 31 32 33 34 35 package com.fengxuechao.examples.sso.res;import org.springframework.boot.SpringApplication;import org.springframework.boot.autoconfigure.SpringBootApplication;import org.springframework.http.ResponseEntity;import org.springframework.security.core.context.SecurityContextHolder;import org.springframework.web.bind.annotation.RequestMapping;import org.springframework.web.bind.annotation.RestController;import java.util.HashMap;import java.util.Map;@SpringBootApplication @RestController public class ClientApp public static void main (String[] args) SpringApplication.run(ClientApp.class, args); } @RequestMapping("/api/userinfo") public ResponseEntity<Map> getUserInfo () String user = (String) SecurityContextHolder.getContext().getAuthentication().getPrincipal(); String email = user + "@test.com" ; Map<String, String> map = new HashMap<>(); map.put("name" , user); map.put("email" , email); return ResponseEntity.ok(map); } }
参考资源